
In Part 2: runtime analysis, we discovered some important addresses in the Energizer Trojan – specifically, the addresses that make the call to recv() data. Be sure to read that section before reading this one.
Now that we have some starting addresses, we can move on to a disassembler and look at what the code’s actually doing. Fortunately, the author made no attempt to disguise the code or pack or or anything like that, so a simple disassembler is all we need to examine the code.
A word of warning: this is the longest, most complicated section. But stick with it, by the end we’ll know exactly how the Trojan ticks!
Sections
This tutorial was getting far too long for a single page, so I broke it into four sections:
- Part 1: setup
- Part 2: runtime analysis (windbg)
- Part 3: disassembling (ida)
- Part 4: generating probes (nmap)
Disassembly -- from the top
If you haven’t already, install IDA somewhere. This part is safe and doesn’t have to be on your sacrificial system, but you probably won’t be able to do this on any system with antivirus installed. Any antivirus program will delete the Trojan before you have a chance to disassemble it.
First off, fire up IDA and load the arucer.dll file (I included it in the same archive as the installer; get it here (password is “infected”, as always be careful when handling live malware); alternatively, navigate to c:\Windows\System32 on the infected machine and grab it).

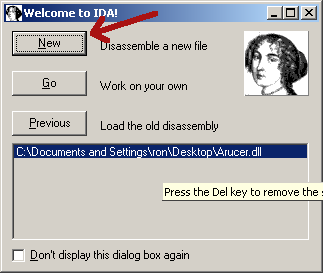
When IDA comes up, it’ll ask you what you want to do. Hit “New”:
When prompted, hit “PE Executable” and then “OK” – in theory, you can probably pick something more appropriate but it auto-detects anyways.

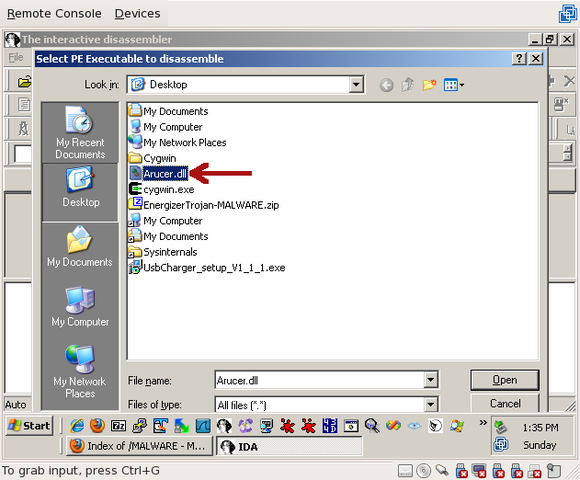
Then, navigate to the path where you extracted Arucer.dll and choose it (you may need to change the “Files of type” dropdown to “all files”:
After selecting it, you’ll be prompted with a bunch of questions. Like installing software, just keep hitting ‘next’ until it stops asking you questions. Eventually, it’ll be loaded up and you’ll be presented with a screen full of assembly. Feel free to customize it how you like; I generally turn off the main menu bar and maximize the sub-windows.
The first thing I like to do when looking at malware, and it’s because I was bitten by this once on a contest, is hit the “Exports” tab and see what it can do:
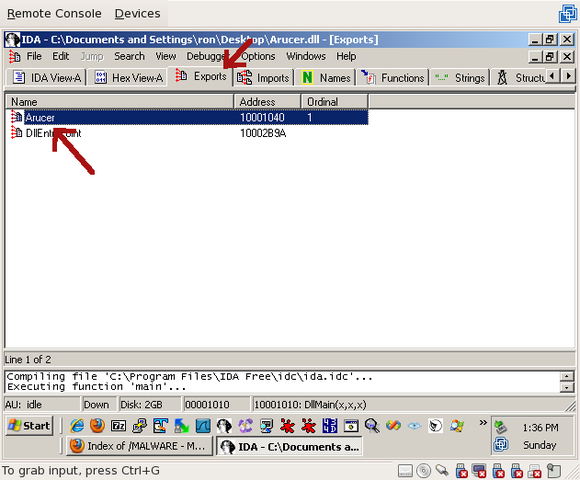
On the Trojan, we can see there are two exports – “DllEntryPoint”, which every .dll file has, and “Arucer”. If you follow DllEntryPoint, you won’t get anywhere. It sets some variables, that’s about it. But if you double-click on Arucer, we can see where the actual Trojan does its work:
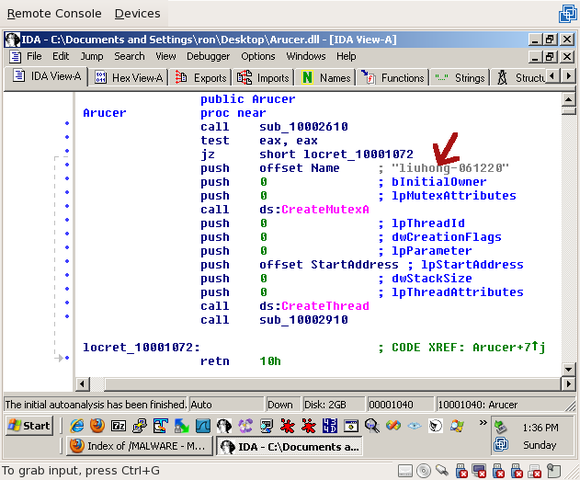
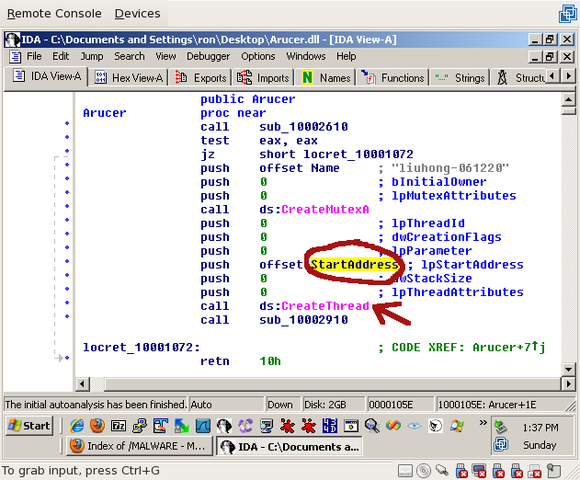
The first thing we see here is a call to CreateMutexA() with the name “liuhong-061220”. Liu Hong, eh? The author, perhaps? Why would somebody writing an actual Trojan put his name in it? That brings back the question of whether this was intended to be a Trojan at all, or just a misguided feature?
After the mutex is created, a call to CreateThread() is made. If you double-click on StartAddress (the address that’s called when the thread starts):
You’ll see a simple loop:
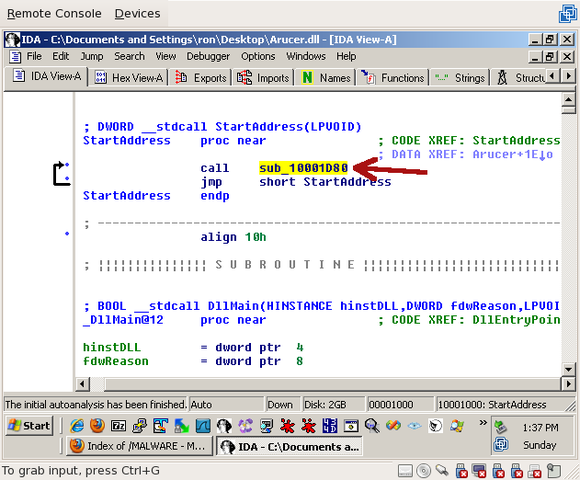
The code calls sub_10001D80 then jumps back to the line that calls sub_10001D80. This is an infinite loop. So double-click on sub_10001D80 and look around. You’ll see that, among other things, a call is made to listen():
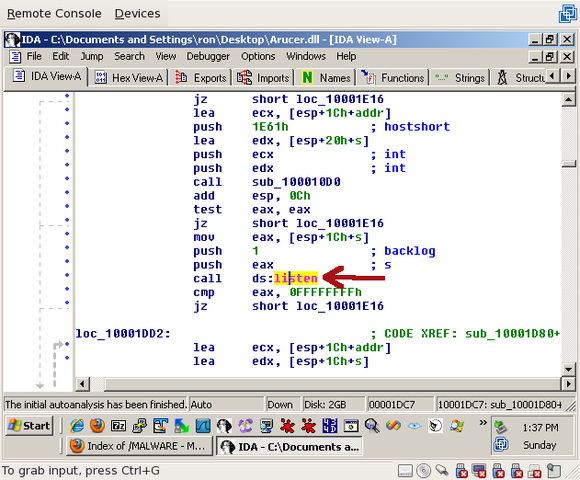
That tells us that we’re definitely on the right track! If you keep going, you’ll eventually make it to the same recv() function that we already found using the debugger.
At this point, feel free to look around a little bit, see if you can understand a little about what’s going on. The biggest key is the system functions being called (like accept(), listen(), recv(), etc) – they tell you what’s going on more than anything else.
Disassembly -- from the bottom
In the last section, we followed the code execution from the beginning of the program to the listen() and accept() calls, which lead to the recv() and send(). That’s one way to skin this catcarrot, but, since we already learned some useful addresses from the debugger, let’s start at one of them: 0x100011aa.
Throughout this section, feel free to explore. I’m posting screenshots and addresses for everything I talk about, so you can always hit “g” (for “go”) and catch up. You can also press “escape” at any time to jump back to the last place you were.
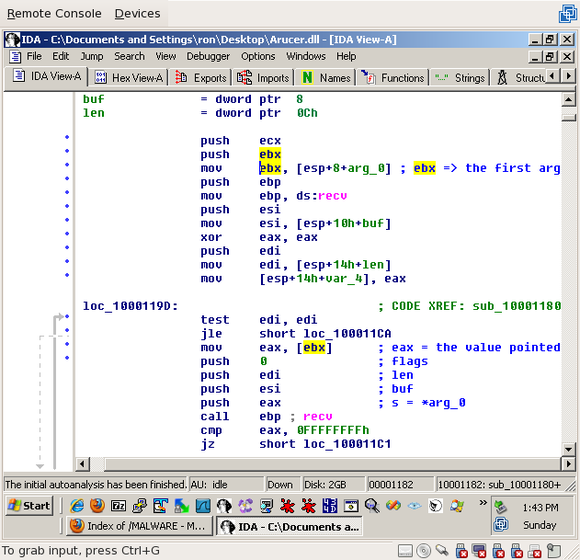
0x100011aa is one of the addresses we found while debugging; it’s the address that called recv(). In IDA, hit “g” and type it in. You’ll find yourself in the middle of a function, right after a call to recv(). Scroll up and find the top of the function (sub_10001180), which will look like this:
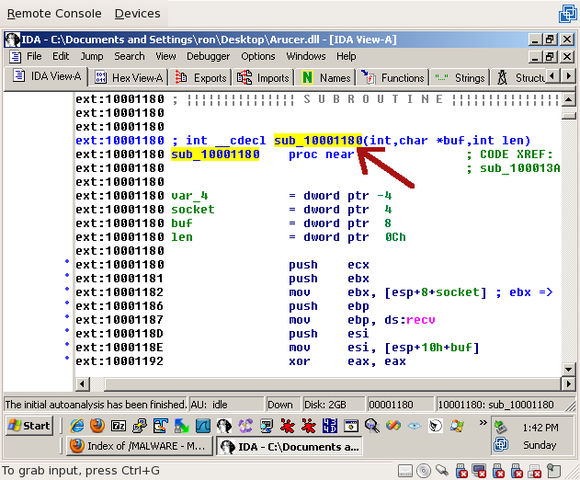
The first thing to note is that this function takes three arguments. The second and third were discovered by IDA to be ‘buf’ and ‘len’, which refer to the buffer and length being passed to the recv() call – the only recv() arguments we’re missing are the socket and the flags.
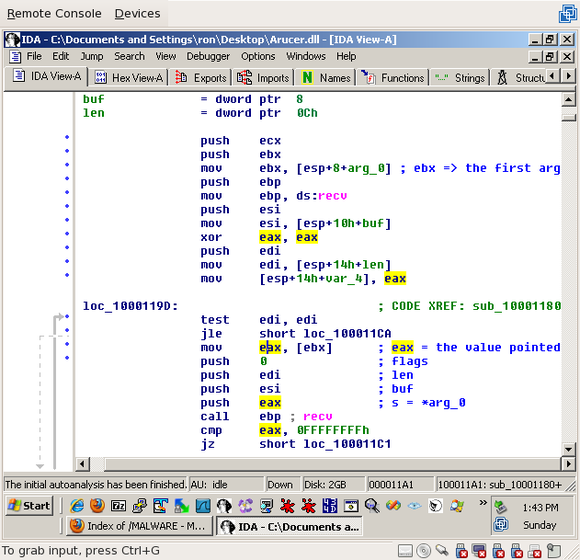
We’re going to try and figure out what the first argument is. if you click on “arg_0” in the list of local variables, you’ll see that three lines into the function it’s moved to ‘ebx’. If you click on ‘ebx’, you’ll see that, a little later, the value it points to is moved to eax:
If you click on ‘eax’, you’ll see that it’s pushed last (and, therefore, is the first argument) to recv(), and, as the automatically generated comment tells you, that’s the ‘s’ (socket) parameter:
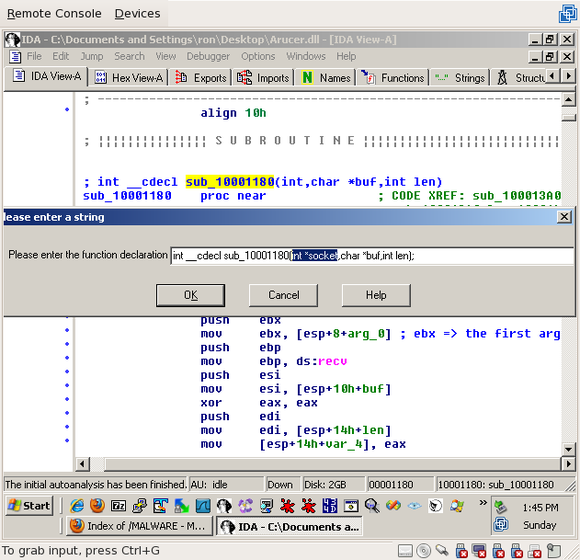
So now that we know what’s going on, we can name the variables properly. Go to the top of sub_10001180 again, click on the name, and press “y” to define the function. Change the first argument to “int *socket”:
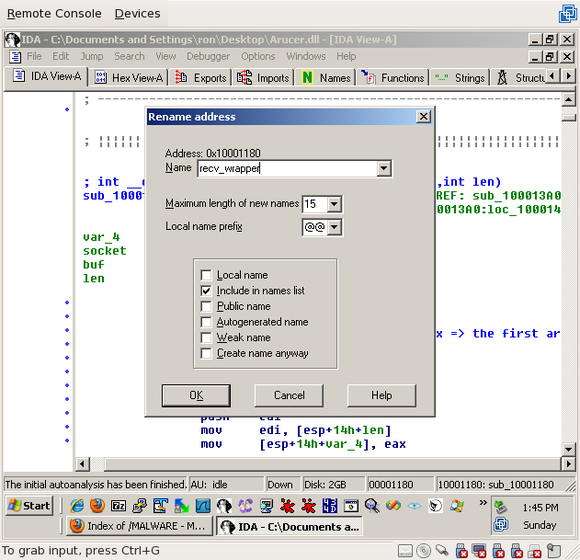
If you scroll around the function, you’ll see that all it really does is recv() some data into the buffer. Therefore, it’s a wrapper around recv(). Click on the function name again (“sub_10001180”) and press “n” to change the name. Type in something you’ll remember; I’ll be using “recv_wrapper”:
One trick here is that this function does a little more than recv(). If you scroll a little past the recv() call to loc_100011D2, you’ll see a little loop:
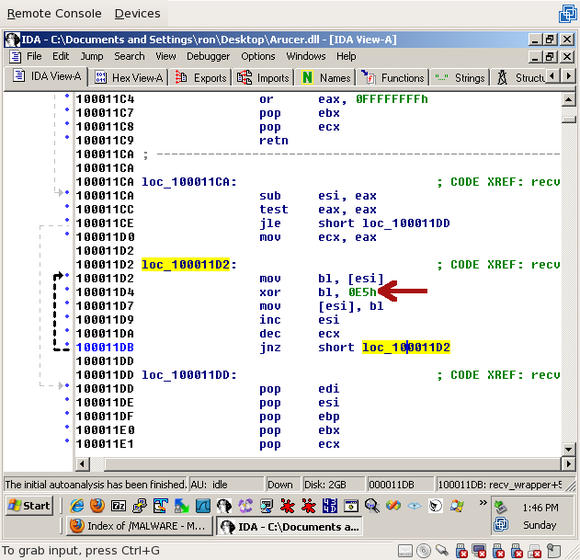
This loop moves a byte from ‘esi’ to the ‘bl’ register, XORs the byte with 0xE5, then puts the byte back into ‘esi’. Then it decrements ecx and loops as long as ecx is non-zero. Even without knowing what the different registers are doing here, it’s pretty obvious what’s going on – every byte in the string is being XORed with 0xE5. That’s a weak encoding, but it’s definitely enough to keep out prying eyes.
Scrolling down a bit further, you’ll find the end of the recv_wrapper() function. Because this function is called from a lot of different places (scroll up and click on the recv_wrapper declaration and press ctrl-x to find out where), the easiest way of finding the caller is to go back to our stacktrace from the debugger; in that stacktrace, the next address was 0x10001624.
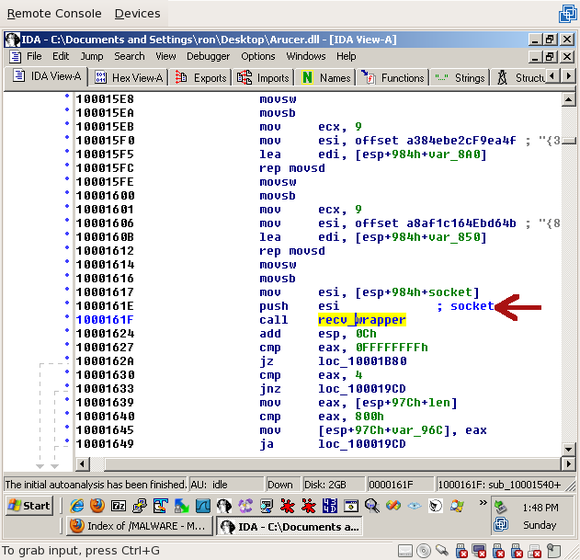
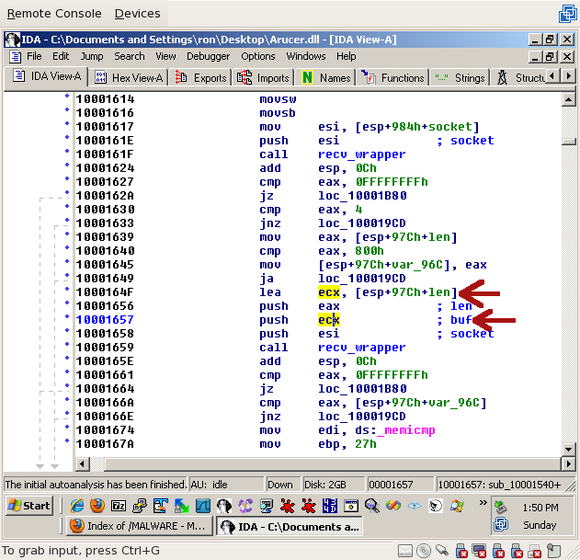
Naturally, the first thing you’ll see at 0x10001624 is, on the previous line, the call to recv_wrapper(). But looking above it, we only see one argument – the socket – being passed to it:
To find the other arguments, you’ll have to scroll way up to 0x10001575. There you’ll see the length (4) and the buffer (eax), which points at a local variable called, at the moment, “len”:
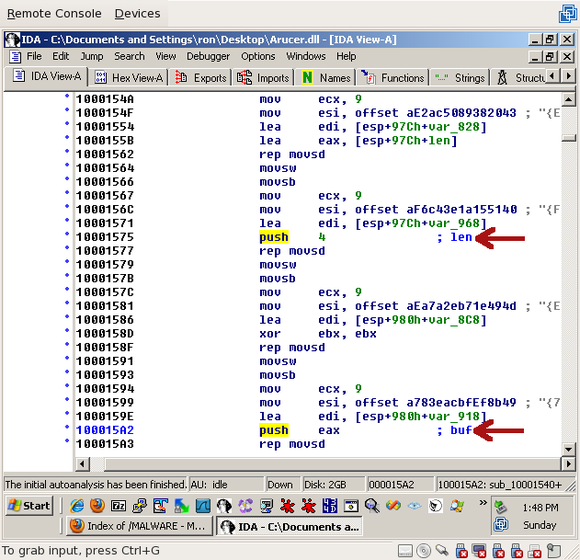
So now we know that exactly 4 bytes are being received. Thinking back to my Battle.net days, that sounds like a packet header – typically, the header will contain the length of the packet, then that many more bytes are received.
Now, if you scroll down a little more past the recv_wrapper() call, to line 0x10001659, you’ll find a second recv_wrapper() – we can guess that it’s probably downloading the rest of the packet. The length being passed is ‘eax’ which, as you can see on line 0x10001639, is set to the buffer from the previous call to recv_wrapper():
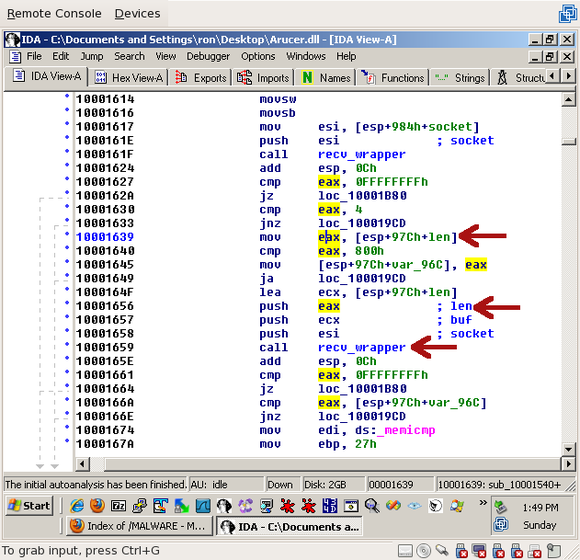
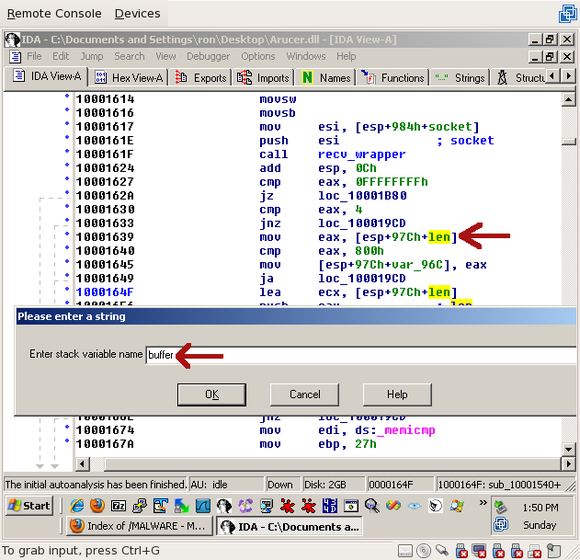
That’s good – we expected the first recv_wrapper() call to return the length. The ‘buf’ argument is also set to the same buffer as the previous call, which was called “len”:
Now that we know it isn’t specifically used for the length, since both recv_wrapper() calls use it as a buffer. To avoid confusion, we should rename it. Click on “len” and press “n” for “name”, and type “buffer” or “buf”:
All right, so now we’ve received a header and a body. But what happens to the body? Let’s have a look:
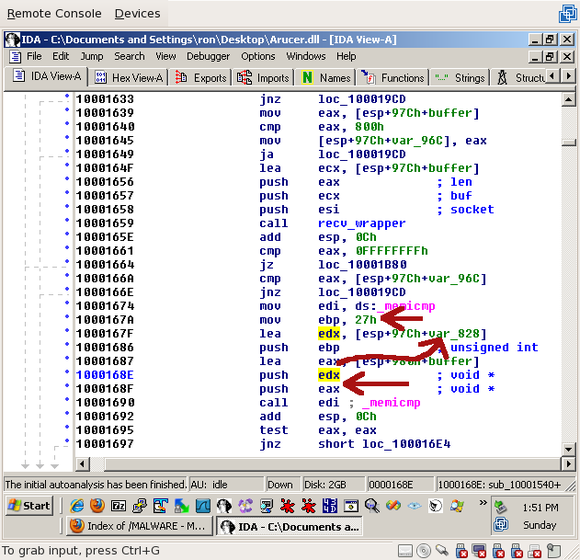
To explain the flow a little: shortly after the call to recv_wrapper(), a call is made to memicmp(). The arguments passed to memicmp() are:
- 'eax', which is the buffer from the recv_wrapper() call -- in other words, the data that was just received (not including the length)
- 'edx', which is a local variable, var_828 -- we'll look more into var_828 shortly
- 0x27, or 39, for the length -- keep this value in mind, we're going to need it
</ul>
As for the var_828, click on it and scroll wayyyy up till you see where it's set, right at the top of this function:
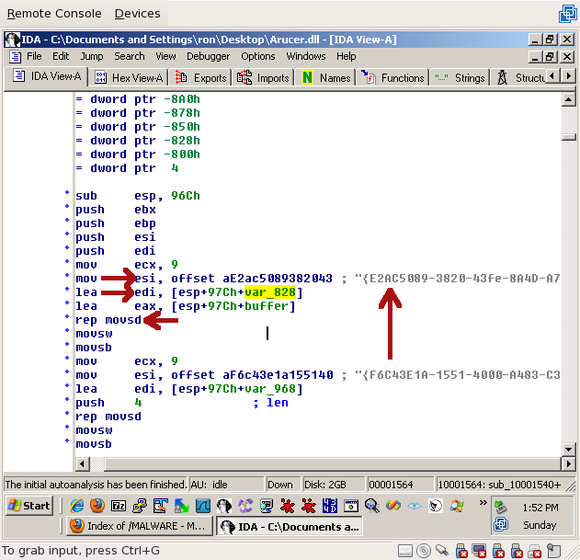 'esi' (the source register) is set to a static string that just happens to be 38 characters long -- 39 including the string terminator. The same length that was passed to memicmp() -- the important part to remember here is that the string terminator is included in the comparison. That's important. Also, keep this string in mind -- we're going to need it while writing our probe.
'edi' (the destination register) is set to var_828. Then 'rep movsd' is executed. 'rep movsd' basically moves data from 'esi' (source) to 'edi' (destination), 'ecx' times. In short, it copies that big long string into var_828.
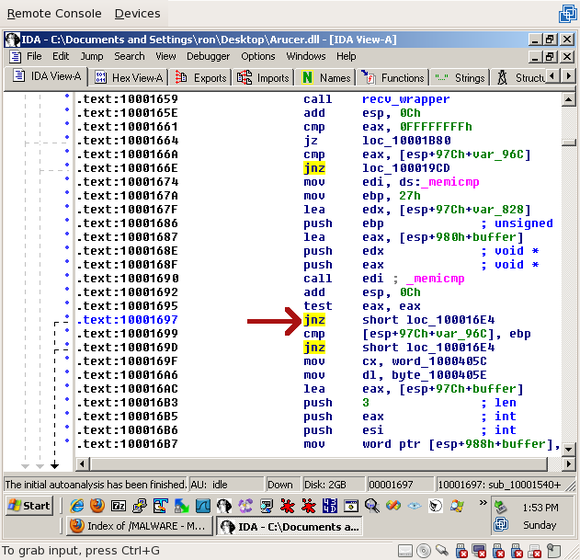
Jumping back down to the memicmp() (0x10001697), the next instruction is a jump-if-not-zero. Since memicmp() returns 0 when strings match, it'll fall through if the data matches our long string:
'esi' (the source register) is set to a static string that just happens to be 38 characters long -- 39 including the string terminator. The same length that was passed to memicmp() -- the important part to remember here is that the string terminator is included in the comparison. That's important. Also, keep this string in mind -- we're going to need it while writing our probe.
'edi' (the destination register) is set to var_828. Then 'rep movsd' is executed. 'rep movsd' basically moves data from 'esi' (source) to 'edi' (destination), 'ecx' times. In short, it copies that big long string into var_828.
Jumping back down to the memicmp() (0x10001697), the next instruction is a jump-if-not-zero. Since memicmp() returns 0 when strings match, it'll fall through if the data matches our long string:
 I realize that's a lot to take in, but we're almost done. Let's summarize what we've seen so far:
- A 4-byte header -- the length -- is recv()'ed from the client
- The rest of the message, as defined by the length, is recv()'ed from the client
- The received bytes are XORed with 0xE5
- The bytes are compared to a 38-character string, "{E2AC5089-3820-43fe-8A4D-A7028FAD8C28}"
- If it matches, ...well, let's talk about that.
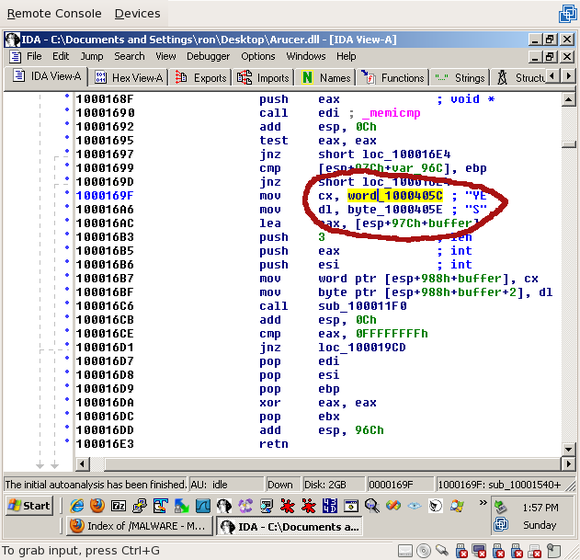
 This function has three arguments: 'esi', 'eax', and "3". 'esi', if you scroll up far enough, is the socket. So what are the other two?
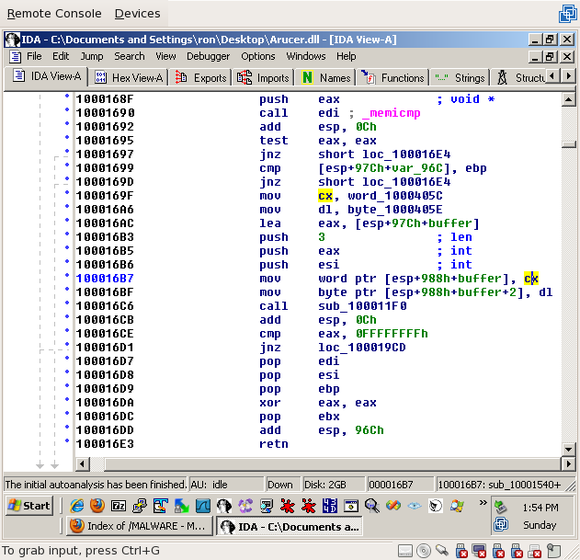
If you look up a few lines to 0x100016AC, you'll see that eax is set to the buffer where the received data was going. After a few more lines, the 'cx' register, which is set to a value at word_1000405C, is put into 'buffer' ('cx' is a 2-byte register):
This function has three arguments: 'esi', 'eax', and "3". 'esi', if you scroll up far enough, is the socket. So what are the other two?
If you look up a few lines to 0x100016AC, you'll see that eax is set to the buffer where the received data was going. After a few more lines, the 'cx' register, which is set to a value at word_1000405C, is put into 'buffer' ('cx' is a 2-byte register):
 Likewise, the third byte in "buffer" is set to 'dl', which is set to byte_1000405E a few lines above ('dl' is a 1-byte register):
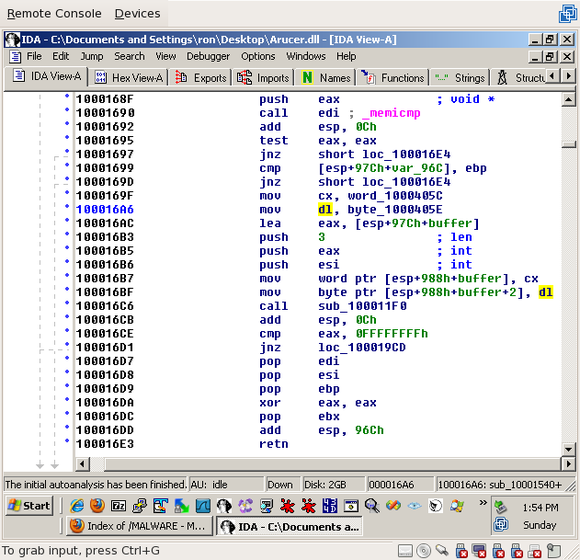 So the first three bytes in the buffer are set from static memory addresses, via the 2-byte register 'cx' and the 1-byte register 'dl'. Now we need to determine what values these two registers had been set to.
To figure out what the values of 'cx' and 'dl' are, double-click on one of them. You'll be brought to 0x1000405C, which should look like this:
So the first three bytes in the buffer are set from static memory addresses, via the 2-byte register 'cx' and the 1-byte register 'dl'. Now we need to determine what values these two registers had been set to.
To figure out what the values of 'cx' and 'dl' are, double-click on one of them. You'll be brought to 0x1000405C, which should look like this:
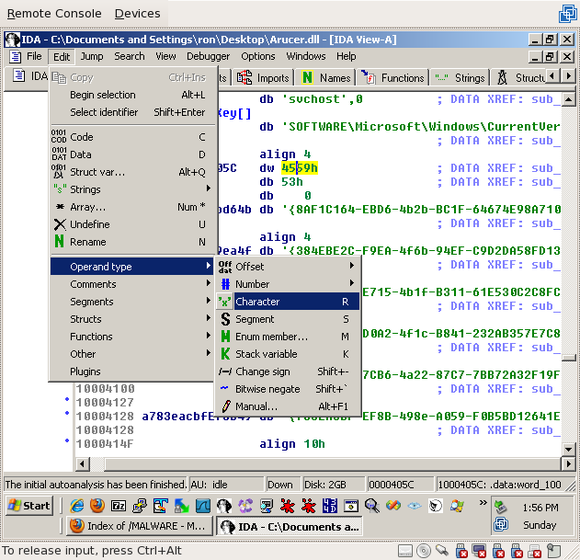
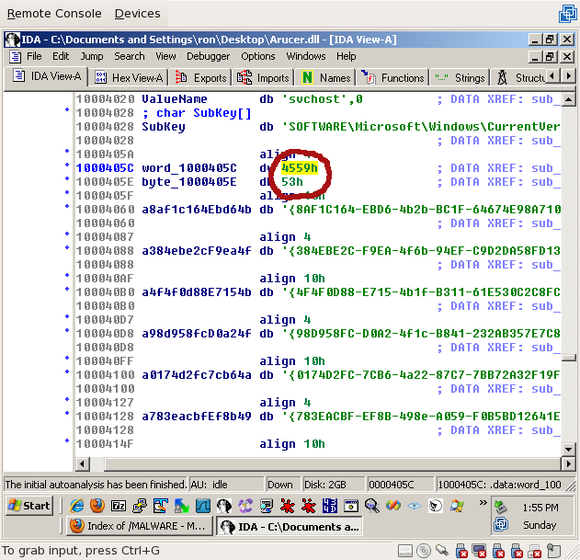 If you've looked at enough hex, you'll immediately recognize these three values on ascii. Click on each of them, then select Edit->Operand type->Character (or just press "R"):
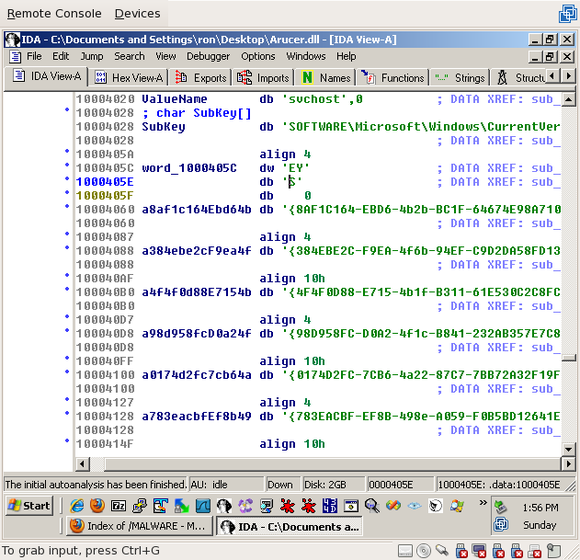
 You'll see that these three bytes are actually, 'EY' and 'S', which, because of little endian, is actually 'YE' and 'S' -- 'YES'!
 Hit "esc" to go back (or press "g" and type 0x1000169F) and, if you'd like, add comments saying what the values are (use ";" or shift-";" to add comments):
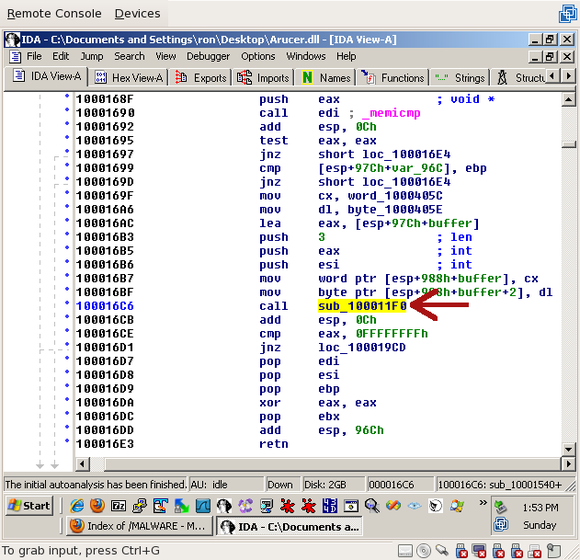
 So, three bytes, "YES", are placed in "buffer" and passed to a function, along with the socket and the number "3" -- the length. It's pretty safe to assume that this function is the send_wrapper(). Double click on it to find out!
Near the top of the send_wrapper() function (sub_100011F0), you'll see another little loop:
So, three bytes, "YES", are placed in "buffer" and passed to a function, along with the socket and the number "3" -- the length. It's pretty safe to assume that this function is the send_wrapper(). Double click on it to find out!
Near the top of the send_wrapper() function (sub_100011F0), you'll see another little loop:
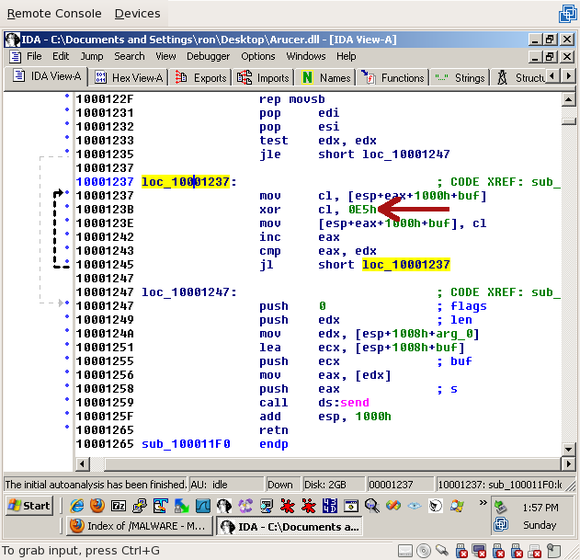 The array is being XORed with 0xE5. Next, we'll see what we're looking for:
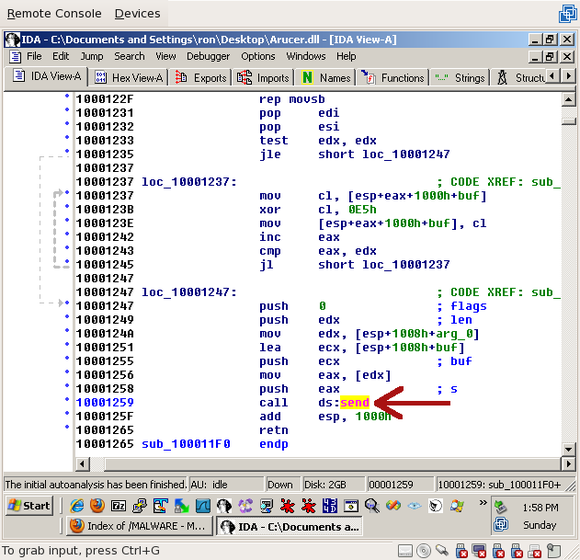 send()! Now we know -- if we send a 4-byte length followed by the 38-byte string ("{E2AC5089-3820-43fe-8A4D-A7028FAD8C28}") and a null terminator, encoded by XORing it with 0xE5, we should receive a 3-byte response ("YES"), also encoded by XORing with 0xE5.
So, in this section we followed the flow of data from the recv() function, which we found with a debugger, to the send() function. We were fortunate that the first type we found was a simple ping -- I send it data, and it replies with "YES". It's safe, doesn't change the state, has a static request, and a static response. Perfect!
In Part 4: generating probes, the final section, we'll actually put the pen to paper (err, characters to harddrive? code to monitor?) and write a probe that implements this ping request.
send()! Now we know -- if we send a 4-byte length followed by the 38-byte string ("{E2AC5089-3820-43fe-8A4D-A7028FAD8C28}") and a null terminator, encoded by XORing it with 0xE5, we should receive a 3-byte response ("YES"), also encoded by XORing with 0xE5.
So, in this section we followed the flow of data from the recv() function, which we found with a debugger, to the send() function. We were fortunate that the first type we found was a simple ping -- I send it data, and it replies with "YES". It's safe, doesn't change the state, has a static request, and a static response. Perfect!
In Part 4: generating probes, the final section, we'll actually put the pen to paper (err, characters to harddrive? code to monitor?) and write a probe that implements this ping request.
Comments
Join the conversation on this Mastodon post (replies will appear below)!
Loading comments...